Labels

Showing posts with label DIY. Show all posts

Thursday, June 6, 2013

Upcycled Clock Picture Frame

On a random shopping trip, I picked up the empty frame of an old mantle clock.  I don't know why, but I did.  I liked it because it was cheap, it had cool lines, and it was a really rad green color.  I had absolutely no idea what to do with it, but I knew it must be mine!

When I got back to the shop, Caiti and I simultaneously had the same idea - the shell of that mantle clock would make an amazing picture frame!


We found an old photo that worked size-wise, and popped it inside the clock frame.  We did have to trim it a bit, which felt horrifying... I hate cutting old things.  But I think this was worth it. 


We covered the back by tracing a piece of card stock, cutting it out, and covering it with some cute cloth.  We used spray adhesive to put the cloth on.

Kind of fun, right?


And isn't this a dapper little family? I love all their outfits! And I'm just noticing now that maybe the girl and the boy are twins? That makes it even cooler!

This piece is for sale at our shop... we may put it on Etsy at some point, we shall see.  What other neat things do you think you could use for picture frames? We're always trying to come up with ideas... I'm pretty smitten with this & this for photo displays

xoxo,
Jess & Caiti

Saturday, June 1, 2013

DIY: Recover Eyeglasses Case

Sometimes inspiration comes in the most unexpected forms. Take this DIY for example. The cutest puppy decided he needed another "teething ring" and found my eyeglasses case to be just right. It gave me an excuse to use some of our fabric hoard and make a cuter case.

Just look at that face!


Supplies:

  • Old case or dollar store case.
  • Fabric
  • Mod Podge
  • Sponge
  • Paper 
  • Scissors and Xacto knife.


Lets begin:

I'm am not sure if it is necessary to remove the old covering but mine was already kindly done for me.  I did remove the inside as it was already peeling up.


Next I traced the case to make a template. The bottom is slightly larger than the top so I made a second template a bit larger. 


Now cut out your fabric.


And begin Mod Podgeing. 


I folded over the fabric when necessary to conform to the contour of the case. Then I trimmed up any over hang with my Xacto. 


I then did the same for the inside. I finished up with a coat over the outside, just for a little added protection.


Let it dry and trim up the inside and you're done!


It's a pretty simple project. Have fun!
xoxo
Caiti


I could never be mad at a face like that...

Thursday, May 30, 2013

furniture redo: the Mermaid Side Table

This side table wasn't something we would normally buy, but we got a good deal, so we brainstormed quite a bit about what we could do to make it less... blech.  The table was that ubiquitous 1970s/80s table that everyone's parents seemed to have in their TV room.  Next to their big recliners... usually covered in various remotes to control the VHS, the TV & the satellite dish.  What I'm saying is, I don't find them to be a beautiful example of furniture design.  


We decided to shabby-chic it up a little bit with a pretty light blue paint.  We thought that the bottom of the table could use a little pizzazz, so we used an image transfer medium from Mod Podge to transfer a vintage mermaid graphic.  (Sidenote: we'll for sure do a DIY Post about that transfer medium later... it's really handy!).   I love how the mermaid graphic makes the blue paint seem very ocean-like... they compliment each other very well, if I do say so myself!


We put it out with some pretty Jadeite Fire King Mugs and I'm pretty in love with it.  
It's for sale in the shop if you're local and would like to check it out! 

Isn't it fun to think about how kind of crappy old furniture can turn into something pretty rad with a few ideas and some elbow grease?  It makes me feel inspired every day to open my mind up a bit and use my imagination as much as I can... as cheesy as that sounds, it's true :)

Cheesily yours,
Jess


Tuesday, May 28, 2013

Button Necklace DIY

It seems like one of the things most crafters and vintage collectors all have is a surplus of is buttons.  You never know what sort of thing you'll come across that needs a neat button, so you save those suckers up!  And sometimes you end up with a ton of them and it gets a little outta hand.  And by "You" I mean "us".  We have a lot of buttons.  One day when I had a surplus of time on my hand I decided to come up with a way to use a few buttons for something a little different...


A button statement necklace!  

What you'll need for this project is: a piece of felt in a color of your choice, buttons, a needle & thread, and some ribbon.  I used an exacto knife for one portion of the process as well, but there are ways to MacGyver around that if you don't have one available. Side note: sleepy expression not required for this project, but I was clearly rocking it just as a bonus.  You're welcome.


Start off by sorting through your button stash.  I know you've got one!  If I'm wrong, and you don't, you can usually find tons of neat buttons at any craft store, or for super cheap at places like yard sales and markets.


Lay your buttons out on your felt in a configuration that looks good to you.  I like necklaces that look a bit abstract, so I chose a semi-weird configuration that was pleasing to my eyeballs.  Feel free to use whatever shape you'd like - stars, hearts, circles... whatever your heart & eyeballs desire.


Outline the shape of your buttons with a marker so you can cut it out.  It's also helpful at this point to take a picture of your buttons, just so you can remember how they're arranged.  Or maybe it would just be helpful to have a better memory than me, and in that case no camera is required.


After cutting your shape out, start sewing those buttons on!  


And ta-da!  You have a necklace!  Well, part of one at least.  You can attach jump rings through the felt and attach it to a chain to finish it, or you could just thread some ribbon through it like I did. 


If you choose to go the easy-peasy route like I did, here's where the Exacto knife comes in.  Cut two small slits close together on the bib, and make sure it's hidden behind a button so you won't see it in the front.  Thread the ribbon through one side and out the other, and knot it back onto itself so it's secure.  Repeat on the other side.  This method makes it so it just slips on over your head, so be sure to leave enough room for your noggin.  You can finagle the ribbon a bit before tying it off and cutting the excess to get it the length you'd like.
 

Ta-da!  You have a whole necklace now!  And you've put a dent in your button collection... so now you have an excuse to go out and buy more!  :)

Saturday, April 13, 2013

furniture redo: The Queen Bee Rocker

I think a lot of people find refinishing furniture to be an arduous, not at all fun process.  I, on the other hand, think it's a super fun adventure!  There's all sorts of opportunity for destruction like tearing off fabric and ripping out staples, and there's the huge satisfaction of seeing such a big project turn out how you want it to.  There's also the chance of things going miserably wrong and it not turning out ANYTHING like you pictured, but I try not to think about that. 

I spent a good part of yesterday working on redoing some chairs, and I'm particularly fond of how this one came out:


The original chair was in pretty good shape... The wood was all in great shape, and the caning on the back was perfect (if you're a junker/thrifter of any sort you'll appreciate how rare that is). 


The upholstery was okay... but it was dirty and drab colored.  At first we were planning on trying out some fabric/upholstery paint, but while shopping for that I fell in love with some printed burlap and decided to go a whole different route


I mean, come on... it's BEES! How can you resist that? I couldn't!  So after some sanding and painting and even more sanding followed by some reupholstering, we have a nice little chair which I've dubbed "The Queen Bee Rocker".


I feel like any time now Caiti should be telling me that's an incorrect name because these clearly aren't queen bees on the fabric... but that's okay.  I still like it anyway.  What do you think?

xoxo,
Jess


Friday, March 8, 2013

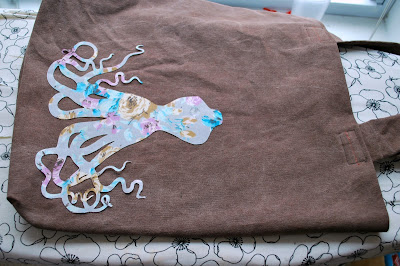
Appliqué Tote Bag

I love doing early morning crafts, I try to pick something easy that I can do in about one to one and a half hours. This mornings project was an appliqué tote. Now I'm not promising a quick DIY but a rather easy and neat looking one. 


Supplies:

  • Fabric for tote or a tote bag.
  • Fabric for appliqué.
  • Heat'n Bond Ultra Hold Iron-on Adhesive.
  • Iron
  • Fray-check (optional)


Lets begin...

If you hoard fabric like me and enjoy sewing I say make yourself a tote. I used this tutorial to make mine. DIY tote. It was soooo easy, I changed my dimensions a bit, mine is 16x16.


Ok, once you've made the tote we must make the appliqué. Follow the directions on the Heat'n Bond package. I simply cut a 10x10 square of fabric and a 10x10 square of Heat'n Bond then ironed them together. I then put them through my Cricut cutter to cut out my design. If you don't have a Cricut go on ebay and buy one, they rock, but also trace and cut your design. Now that it's cut you have the option to apply fray-check to the edge of your design following package directions. I chose to skip this part.


Peel the back off the appliqué and position it however your heart desires. Again refer to the directions on the package, iron that baby on.


And whoala, you're done. So easy! Now if you wanted to take the time, which i didn't, you could line your bag and use fray check around the edge of your appliqué. That would give your tote a very professional feel. I'm pretty happy with how it turned out without those added steps. 


Have fun,
~Caiti 


(Obligatory supervisors photo.)


Tuesday, February 19, 2013

Glitter Stenciled Sweatshirt

My Pinterest feed was all a flutter with hearts, glitter and Ryan Gosling this past Valentines day. I was inspired by two of the three to do this DIY. I saw a post for a glitter heart children's tee that got my brain chugging...Why not combine three of my favorite things, the macabre, glitter, and sweatshirts. Here it is, glitter stenciled sweatshirt.  


Supplies: 
  • sweatshirt
  • stencil cut out of contact paper. I used my Cricut to cut the rib-cage  but you could easily trace and cut with an exacto knife. 
  • Tacky Glue or Mod Podge Fabric glue.
  • Paint brush, I ended up using a smaller junk paint brush.
  • GLITTER.
  • Workspace


Lets begin...


After you've cut your stencil and set up your work space you can begin the jerky task of getting that stencil on the sweatshirt. I found that putting painters tape on the front of the design before you peel the back off worked the best. 


After the front is covered with painters tape, peel off the back and adhere to where you'd like your design. Give it a good rub down and begin to peel the tape off. You may have to hold the contact paper edges down but it shouldn't stick to the tape. If that makes any sense at all...


Now start painting the glue on. I would paint a bit then sprinkle the glitter on, working in sections until it was covered in gluey, glittery mess.


Then let it dry. I gave it about one Arrested Development episodes worth and carefully shook off the excess glitter.

When it no longer feels wet, peel off the contact paper. I used a little lint brush roller to get the stray glitter. Your done. I'm not sure how this will wash so I will err on the side of caution and say hand wash this lovely. 


Im interested to see how you fare. Have fun.
~Caiti


Oh and thank you to my Supervisor(s).


Thursday, December 27, 2012

DIY Glitter Nail Polish

Inspired by one of Laura's posts on Mainetoday about a DIY holiday manicure, I felt inspired to get my glitter on!  I decided to do some DIY of my own...

I'm usually really into colors that other people aren't into, so I have a hard time finding nail polish that I dig.. especially when it comes to polish of the glitter variety.  But every now and then, even a girl with weird taste needs to be shiny.  I had some lovely copper glitter I had fallen in love with ages ago, and some clear nail polish, and it occurred to me... EUREKA! I can make my own glitter polish! It seemed so simple! 

And... it totally was.


It's an incredibly easy-peasy DIY.  All you need is some clear polish, some glitter, and a means of funneling the glitter in.


Step 1.  Realize that the funnel you have is too big to fit into the nail polish.  Use a piece of paper formed into a makeshift funnel instead.  Or, if you're more prepared than me you can just use a small funnel.


Step 2.  Pour some glitter into the bottle.  Realize that it's a good idea you did this project while your husband was sleeping because he hates glitter.


Step 3.  Let it settle for a second... my glitter was really big pieces, so it took a minute for it to settle down into the bottle so I could add more.  


Step 4.  Shake it like a Polaroid picture! Or, just... shake it.. because you're really not supposed to shake Polaroids, you know.  Again, depending on how heavy your glitter is, it might take a minute to blend in.


And TA-DA! You've got your very own glittery concoction.  Feel free to go crazy with mixing colors of glitter... and mixing it up with different base coats underneath it.


I had a holiday party to go to, so I did a bit of a quick & dirty manicure with some iridescent white polish as a base coat.  I was going to do the ombre manicure that Laura did in her article, but I got too excited about the glitter and just kept adding more :)

Oh, and... my husband still managed to find glitter (ahem, everywhere) and complain about it, so you may want to be a bit more dainty than I was if you have a similar grumbly person in your life.  

Still totally worth it though.  And maybe perfect for some New Year's Eve nails?

Happy shiny holiday wishes,
Jess


Saturday, December 22, 2012

DIY Vintage Photo Magnets

I've mentioned in previous posts that I have a weakness for old photos.  I tend to pick them up (I may or may not refer to it as 'adopting them') at flea markets, garage sales, and wherever old family photos are discarded.  I also have quite the collection of my own family's photos... I've sort of become the keeper of the family photographic memories, which I love.  But sometimes, I don't know how to display all of these beauties.  I don't always want to frame them, but I definitely don't want them to just collect dust in a drawer...  I decided the other day to take advantage of the little bit of fridge space I have, and make a couple old photos into magnets! 


All you need for this project is Magnetic Adhesive Sheet (I got mine at Michael's), some scissors, and whatever photos you'd like to magnetize (side bar: am I the only one who thinks of Mos Def in Be Kind Rewind, every time someone says "magnetized"? "you're maaaagnetized!" yeah? just me? okay, anywho)


I chose a couple photos of strangers I had acquired over the years but didn't have  place for. I laid the photos on the sheet to make sure I had enough space to cut them out.  I cut them freehand, but if you want to do it the "right", "thorough", or "correct" way, I would suggest flipping it over and tracing the picture on the back of the sheet and then cutting that out.  I tend to cut corners, but I get the job done. 


As you can see, the back of these sheets are magnetic on the front, and have a sheet on the back you can peel off.. I cut out my magnetic sheet to the corresponding photo sizes, and peeled off the sheet and exposed the adhesive...


...then stuck it onto the back of the photo.  Et voila! 


Now these lovely photos, of the lady in the boat and the happy father & son, are appreciated every single day instead of languishing in my craft supply drawer.  I even kept the sort of bedraggled shape of the photo of the father & son... it looks like someone cut it from a larger photo, and I somehow think that gives it a bit of character of its own.  I always wonder what the rest of the photo looked like...


I'm pretty sure they like it on the fridge with my other weird magnets and my awkward cruise honeymoon photo.  Keep in mind though, the magnet isn't super heavy duty, so it doesn't hold up more than a piece of paper... I wouldn't suggest it as a magnet for other photos on the fridge as they'd probably fall right out.  I personally like them just as art for the fridge, what do you think?  

Do you have any photos you're going to transform?  I think these would make lovely last minute gifts for family if you used old family photos! 

Have fun!
-Jess