Labels

Saturday, April 13, 2013

furniture redo: The Queen Bee Rocker

I think a lot of people find refinishing furniture to be an arduous, not at all fun process.  I, on the other hand, think it's a super fun adventure!  There's all sorts of opportunity for destruction like tearing off fabric and ripping out staples, and there's the huge satisfaction of seeing such a big project turn out how you want it to.  There's also the chance of things going miserably wrong and it not turning out ANYTHING like you pictured, but I try not to think about that. 

I spent a good part of yesterday working on redoing some chairs, and I'm particularly fond of how this one came out:


The original chair was in pretty good shape... The wood was all in great shape, and the caning on the back was perfect (if you're a junker/thrifter of any sort you'll appreciate how rare that is). 


The upholstery was okay... but it was dirty and drab colored.  At first we were planning on trying out some fabric/upholstery paint, but while shopping for that I fell in love with some printed burlap and decided to go a whole different route


I mean, come on... it's BEES! How can you resist that? I couldn't!  So after some sanding and painting and even more sanding followed by some reupholstering, we have a nice little chair which I've dubbed "The Queen Bee Rocker".


I feel like any time now Caiti should be telling me that's an incorrect name because these clearly aren't queen bees on the fabric... but that's okay.  I still like it anyway.  What do you think?

xoxo,
Jess


Thursday, April 11, 2013

shop update!

So far one of the best things about having an actual shop is the simple pleasure of having everything in one place.  Caiti and I have been splitting things between our respective houses and the flea market we were selling at for so long that it's surprisingly exciting to have everything all together! It used to be everything was always scattered around and we never knew what was located where.  We'd sell something on Etsy and it would be a mad scramble to figure out where the heck it was!  Also, taking photos was a pain in the butt.  Caiti's house had the best natural light so she ended up taking photos of most of the clothing, and I'd bring home small things from time to time so she didn't have to take on the whole workload.  But we were constantly trading the camera back and forth and swapping SD cards to edit images.  Not really fun. But NOW... we have a specific spot for taking Etsy photos! Huzzah!  It really is crazy exciting, I think. 

So I spent a good amount of Tuesday & Wednesday gleefully snapping away for Etsy listings.  Here's what we've been working on!


and... these are a couple pieces that were photographed on Wednesday that I'm especially fond of.  They'll be up on Etsy sometime soon (if you see anything you like, let us know and we can reserve it!)

I love the neutral-ness of this dress... but it's so fancy and lacy!

This dress is actually a 1980s Laura Ashley sundress that was atrociously long, which made it pretty unattractive.  Caiti decided to shorten the hem a bit, and now we're both head over heels in love with it.  It's like the perfect spring dress!  Funny what a difference a little chop can make, huh? 


I'm very into this red & white striped blazer.  It's a light weight fabric and has a linen look to it so it would be perfect for spring.  I'm really into stripes right now (obviously). 

Hope you're ready for lots more Etsy listings, now that we've got the space :)

xoxo,
Jess


Wednesday, April 10, 2013

sunday at the shop outfit

We had a bit of free time on Sunday, so I (Jess) decided to take photos of my outfit.  I tried to convince Caiti to do the same but she was too ashamed of us wearing accidentally matching outfits.  She came in that morning, took one look at my outfit and shamefully took off her coat, revealing a black and white striped shirt.  That would be worth a laugh if it didn't happen ALL. THE. TIME.  People genuinely think that we are trying to coordinate/wear a uniform.  Nope, just the same brain, apparently. So she hid in the back room screen printing while I snapped some shots of my duds.

If I look exceptionally tired, it's because I am.  And I'm not sure how I even feel about this outfit, but I do know that it was exceptionally comfortable, which mattered a lot to me.  I've taken to leaving my house slippers at the shop, so the fact that I'm not wearing those is an accomplishment, trust me.


I call this my Beetlejuice blazer.  Also, I scored a defective version of a necklace I made that I love (even though moths scare the bejesus out of me)


This is our sassy rug... I've taken to calling her Irma.  We were going to buy a practical, somewhat neutral rug, but my craziness got the better of me at Ikea.  It's going to be dirty as all getup all the time, but it's so fabulous I don't even caaaaaare!

just hangin' out in my blazer in front of a rack of blazers.  So meta.  also, behind me you can see a peek of one of the ribcage sweatshirts Caiti made the other day.  I'm very much in love with them. 

and that picture also gives you a peek at her striped shirt.  Seriously, our matching is a real problem. 

Stripes and stripes forever,
Jess


Tuesday, April 9, 2013

shop tour: LUCILLE'S!!!!

On April 6th we opened our shop!  We put a huge amount of work into it (see our last entry to see what it used to look like), and our brains are still spinning from lack of sleep and from making more decisions than we ever thought humanly possible.  We're incredibly excited and stupidly tired, and still working on lots and lots of things... but thought we'd share some pictures so you could take a peek!


This is our sign that took WAY too long to hand paint, but came out amazing

We're still filling up the shop, but we're excited.  Isn't the floor the best color? 
That's Caiti's dude Steve loitering by the counter.


I'm sure we'll be sharing a billion more pictures as time goes on and we add more things...  it's exciting to think that our biggest upcoming task is shopping! Life isn't so bad, ya know? :)

xoxo,
Jess

Saturday, March 23, 2013

Marco...

Polo...
Jess and I have been very remiss in writing posts lately. We are very sorry, we've been super busy. As you may (or may not know) we are in the process of opening our first store. We both fell in love with this location, and luckily it happened to meet our needs. It also happened to be a bit of a fixer upper.
The first week was slightly daunting, there seemed to be a never ending list of fixes to be made.


But with the help of my dad Chuck, Matt, Steve and Nick. We seem to be getting s*!t done. 

Ok so here are some progress photos.....


Front room.

Door to second room prior to destruction. 

Tearing things up...we really wanted to knock the wall down but settled for the less extensive widening.

Wreck it Ralph, I mean Steve destroying the previous tenants counter. It was soooo wonky.

Aerial of the pretty new cash wrap Dad and Matt put in.

So that's all you can see for now, we're in the process of painting walls and floors. You'll have to come to our Grand Opening, April 6th to see the end results. Check out our facebook page for event details. 


xoxo
Caiti & Jess 


As always we had a four legged supervisor on duty. 

Friday, March 8, 2013

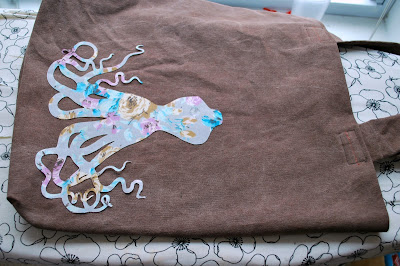
Appliqué Tote Bag

I love doing early morning crafts, I try to pick something easy that I can do in about one to one and a half hours. This mornings project was an appliqué tote. Now I'm not promising a quick DIY but a rather easy and neat looking one. 


Supplies:

  • Fabric for tote or a tote bag.
  • Fabric for appliqué.
  • Heat'n Bond Ultra Hold Iron-on Adhesive.
  • Iron
  • Fray-check (optional)


Lets begin...

If you hoard fabric like me and enjoy sewing I say make yourself a tote. I used this tutorial to make mine. DIY tote. It was soooo easy, I changed my dimensions a bit, mine is 16x16.


Ok, once you've made the tote we must make the appliqué. Follow the directions on the Heat'n Bond package. I simply cut a 10x10 square of fabric and a 10x10 square of Heat'n Bond then ironed them together. I then put them through my Cricut cutter to cut out my design. If you don't have a Cricut go on ebay and buy one, they rock, but also trace and cut your design. Now that it's cut you have the option to apply fray-check to the edge of your design following package directions. I chose to skip this part.


Peel the back off the appliqué and position it however your heart desires. Again refer to the directions on the package, iron that baby on.


And whoala, you're done. So easy! Now if you wanted to take the time, which i didn't, you could line your bag and use fray check around the edge of your appliqué. That would give your tote a very professional feel. I'm pretty happy with how it turned out without those added steps. 


Have fun,
~Caiti 


(Obligatory supervisors photo.)


Tuesday, March 5, 2013

just a teeny thought for the day


something to ponder on, brought to you by Edwin Land, creator of the Polaroid camera.  I'll certainly be pondering it, as I take on my manifestly important and nearly impossible projects...  they're really the best kind of projects, aren't they?

xoxo,
Jess